Tutorial: Design Your Blog with Gadgets

This is a tutorial on how to customize the style of your blog by using Blogger’s Gadgets.

This post was inspired by the Blogger Document, titled Change the design of your blog.

“Gadgets” are tools a user can add to sections of their blog, such as the sidebar. Each gadget has a different feature, like search bars, follower counts, and more!

Steps:


1. Log into Blogger.

2. On the left sidebar, select the “Layout” tab.

The layout tab on Blogger.

3. Click on the blue “Add a Gadget” hyperlinked text. In my example, I will be adding the gadget in the 

sidebar. 

A hyperlink with blue text that reads "Add a Gadget."

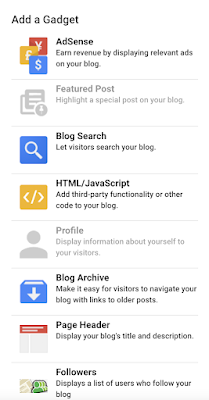
4. Select the Gadget.

A list of gadgets available on Blogger. It features AdSense, Featured Posts, Blog Search, HTML/JavaScript, Profile, Blog Archive, Page Header, and Followers.

5. Customize the gadget’s settings and select “Save.”

The Configure Labels section in Blogger that allows users to customize the gadget's settings.

6. The gadget should now be displayed!

A gadget displayed in Blogger.

Comments

Popular posts from this blog

Tutorial: How to Create a Blog on Blogger

This is a tutorial on how to start a blog on Blogger.     This post was inspired by the Support Document on Blogger, titled Create a blog . Blogger is a website by Google where individuals can “create a unique and beautiful blog easily,” ( Blogger ).             A  “Blog” is a platform where information can be shared through posts.     Steps:   1. To start blogging, first click “Sign In” or "Create Your Blog” on Blogger’s website. 2. This will bring you to the Google log-in page. Either sign in with an existing Google address or create an account.   3. You will be brought to the home page titled “Blogger Posts.” Locate the small grey arrow at the top left corner of the page and click it.   4. A menu will appear. Select “New Blog…”   6. Brainstorm, create, and select a name for your Blog. Click the text field and enter the name.   7. Select the “Next” button.   8. After you have selected it’s name, cre...